DIY Rock Candy Chandelier
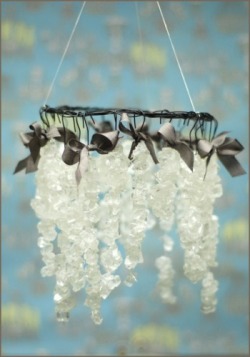

DIY Rock Candy Chandelier
What You'll Need
Rock Candy Strings Bailing wire (I used 16 gauge) ( 1.5 inches for each)
Seam binding or ribbon (about 10" for each, 1/2"or so wide)
Wire cutters
Scissors
Hot glue gun and glue sticks
Resources:
Rock Candy can be found at stores selling bulk candy. It can also be ordered through online resources like Oh, Nuts and Candy Warehouse.
Seam Binding can be purchased at any fabric store. There are also a lot of vendors on Etsy selling it too. Bailing wire is available at any hardware store.
Directions:
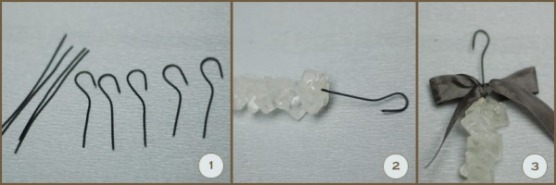
1. Begin by using your wire cutters to cut 1.5 inch lengths of wire. You'll need one per crystal. (see figure 1)
2. Bend your wire into a "Shepard's hook" shape. I bent mine over a pencil to make a nice curve. (see figure 1)
3. At the very end of one of you rock candy strings, put a generous glob of hot glue. Stick the end of the hook into the glue, and hold until it has cooled. If it wiggles a bit, add another dab to secure it. (see figure 2)
4. Cut a length of ribbon, about 10 inches long and tie a knot, then a bow around the wire at the top of the crystal. Trim your ribbon tails.
5. Hang your completed crystals anywhere that needs a little sparkle; on bare branches in a vase, from a tree, in a floral arrangement, from garland or an arch. If you're feeling extra crafty, construct an armature and hang the crystals from it like a chandelier. (see pic below)
A Tip:
If you have a lot of short candy strings, you can join them together using hot glue to make longer strands What it cost: Rock Candy - $5 a pound (I bought 1.25 pounds, and got about 25 strands) Bailing Wire - $3 for a 50 ft spool Seam binding - $.25 - .50 per yard (from most Etsy sellers)
DIY Hanging Handkerchief Vases
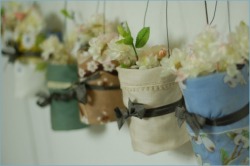
DIY Hanging Handkerchief Vases
What You'll Need: Several Canning Jars (1/2 pint wide mouth with the straight sides)
Several Handkerchiefs (in coordinating colors)
Ribbon
Bailing Wire
Rubber Bands
Flowers
Wire Cutters
Scissors
Iron and Ironing Board
Resources: Canning jars are easy to find at yard sales and thrift stores, so are handkerchiefs. Bailing wire is available at any hardware store.
Directions:
1. Press all of your handkerchiefs flat. (if you're going to be use these in a humid location, I would suggest using a little spray starch to help keep them crisp)
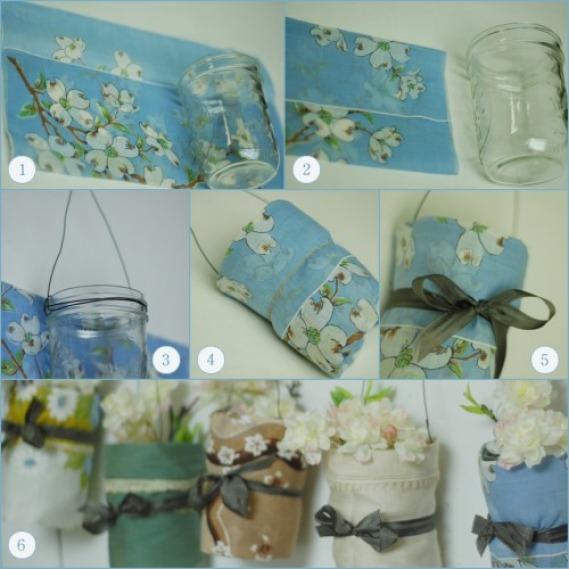
2. Fold the bottom of your handkerchief up (see figure 1) and the top of the handkerchief down (see figure 2) to create a band of fabric that is the same height as the jar. Press the folds.
3. Cut a 2 1/2 foot length of bailing wire. Wrap it tightly around the grooves in the top of the jar, then create a hanger. (see figure 3)
4. Wrap the folded handkerchief around the vase and secure it with a rubber band. (see figure 4)
5. Cut a length of ribbon (about 18 inches or so) and tie it around the vase to conceal the rubber band. Tie the tails in a bow. (see figure 5)
6. Add a little water in the bottom of your vase, insert the flowers. ( see figure 6)
7. Create a grouping of coordinating vases and hang from a tree, and arbor, or from the ceiling.
What it Cost: Handkerchiefs $.25 - $3.00 each
Ribbon $.25 a yard
Bailing wire $3 for a 50 foot spool
Jars, if purchased new are about $9 for one dozen (but they are easily found for much less when used)
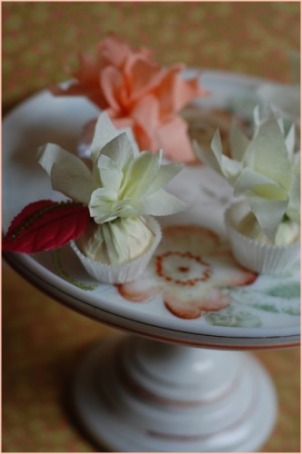
DIY: Making Sweets Sweeter
DIY: Making Sweets Sweeter
How to Make Your Chocolates "Bloom"
What You'll Need: Crepe paper ( or tissue paper)
Ribbon (1/8 of an inch wide)
Wired millinery leaves
Foil wrapped chocolates
Scissors
Low temp glue gun
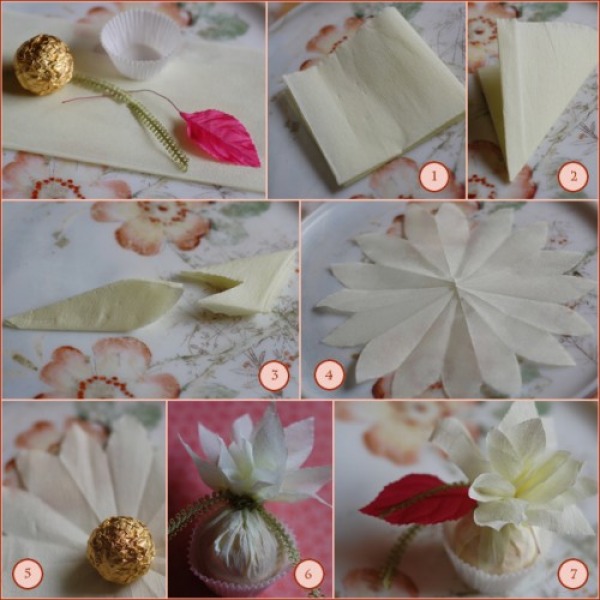
Instructions
1. Begin by cutting a 6" (approximately) square of crepe paper.
2. Fold in half, then into quarters. (See figure 1)
3. Fold in half again to make a triangle (see figure 2) and then fold in half again. (It's just like your folding a snowflake).
4. Cut a rounded "V" in the non pointy end of the triangle. (see figure 3)
5. Unfold your crepe paper. It should be shaped like a daisy. ( see figure 4)
6. Put a foil-wrapped chocolate in the center of the daisy. (see figure 5).
7. Pull the petals up around the chocolate, and tie a ribbon just above the top of the chocolate.
8. Drop into the candy cup, and fluff your paper flower petals. Add a wired leaf around the neck to complete.
9. Arrange on a dish or place a bloom at each place setting.
Resources: Candy foils and cups are available at any large craft store or online at Kitchen Krafts. Martha Stewart has beautiful waxed papers for wrapping candies at Michael's.
All of these ideas were cut and pasted from www.oncewed.com
